An introduction on how to export and import JavaScript modules
There seems to be some confusion when it comes to JavaScript modules. Some developers are unsure of how they work and why are various ways that they can be used. To clear up some of these misconceptions, this article will explain the different ways in which you can export and import modules.
First, let’s explore background of JavaScript modules.
JavaScript programs started as simple scripts or apps that had rather small codebases. But after time, its evolved and so has its uses meaning there’s been an increase in the size of codebases. To support this increase the language needed to support a mechanism under which was possible to separate or split the code into smaller, reusable units. Node.JS had that ability for a while before it was incorporated in JavaScript with a feature called ‘modules.’ Eventually, they made it to the language itself and the browsers.
By definition, a module is just a file which can be imported from other modules (or files) through the help of directives like export and import:
-
export: keyword labels variables and functions that should be accessible from outside the current module. -
import: allows the import of functionality from other modules.
But, we’ll come back to more of that later. Now, let’s take a look at an example.
To demonstrate the use of modules we will create a simple user module that will expose a User class. Let’s review the basic structure for the project:
Our app will be very simple and it will show the name of a user on the screen, but the interesting part is the name will come from an object instance of the User class. Let’s see it in action with a live demo:
Exporting module user
The first thing required to access the User class is to export it from the module. To to do this, we need to make use of the export statement.
The export statement is used when creating JavaScript modules to export live bindings to functions, objects, or primitive values from the module so they can be used by other programs with the import statement.
Let’s see that in our code:
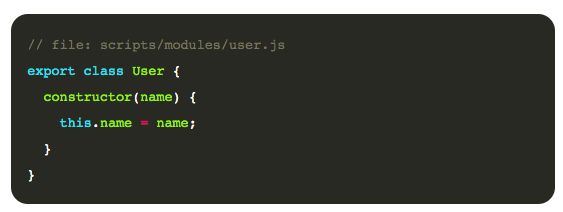
Now that the module was exported we can use it in other modules by simply importing it.
How to import a module user
The static import statement is used to import read-only live bindings which are exported by another module. Imported modules are in strict mode whether you declare them as such or not. The import statement cannot be used in embedded scripts unless a script has a type=”module”. Bindings imported are called ‘live bindings’ because they’re updated by the module that exported the binding.
Let’s see it in our example:
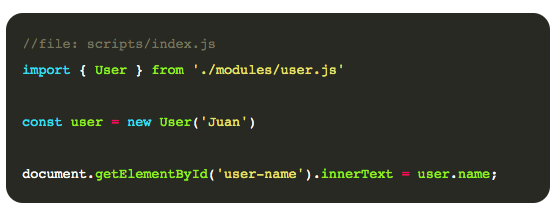
The import statement allows us to import specific bindings from a module. There are several different ways to specify what we’re importing, and we’ll discuss them later in this article. For now, in our example, we’re just importing User from the specified module, or file.
After importing, we can use that object as it’s part of the same file.
Default exports versus named exports
So far, we’ve exported a class by its name, but there are two different ways to export out of modules:
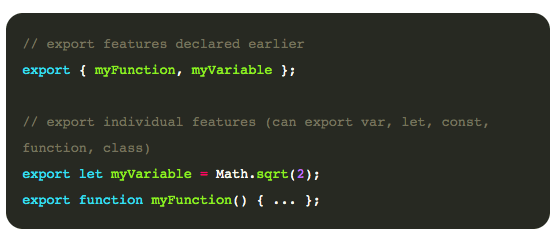
- Named Exports (Zero or more exports per module)
- Default Exports (Only one per module)
Here are some examples of ‘named exports:’
And, ‘default exports:’
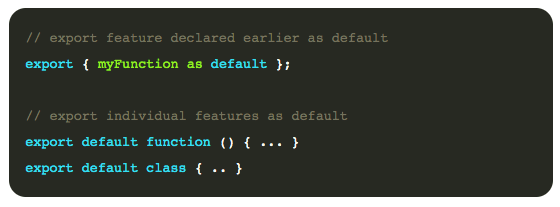
Named exports are useful to export several values. During the import, it’s mandatory to use the same name as the corresponding object. But a default export can be imported with any name. For example:
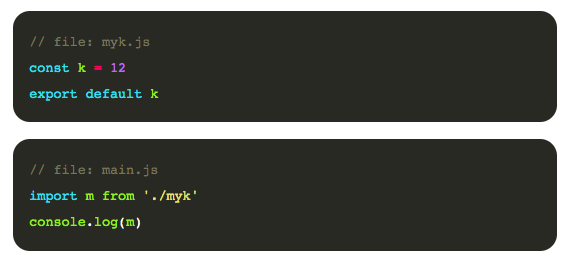
When using named exports, it’s also possible to assign a custom name to the exported value like in this following example below:

The value exported can now be imported as newName rather than name.
Now, let’s move on to ‘importing’
We already saw a few examples of how we can import either named or default exports from modules. But here are more options when it comes to importing.
How to import a default export

How to import a named export

How to rename an import

How to import all from a module

So far all the ways we’ve described here are static imports, meaning that you place them on top of your file and the contents of the module are always imported. But this doesn’t always have to be the case, you can also have dynamic imports.
What are dynamic imports?
This allows you to dynamically load modules only when they are needed, rather than having to load everything upfront. This has some obvious performance advantages. Let’s read on and see how it works.
This new functionality allows you to call import() as a function, passing it the path to the module as a parameter. It returns a promise, which fulfills with a module object giving you access to that object’s exports. For example:

Combining default and named exports
Yes, you read that right. It’s possible to combine default and named and as you might have already expected, you can import both of them. Let’s see an example:
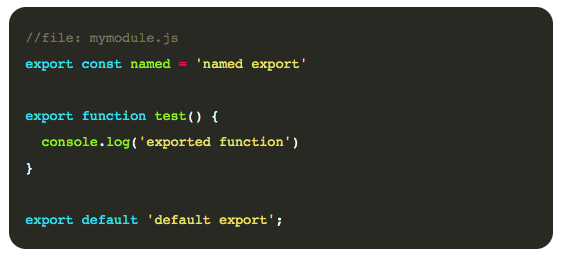
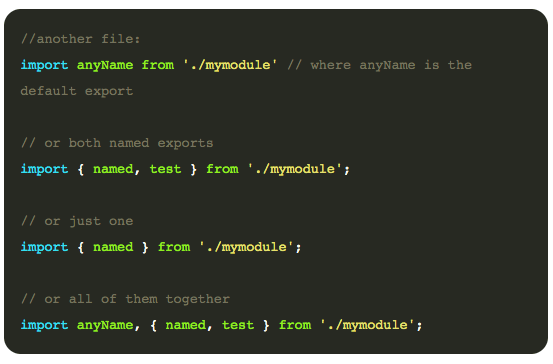
And we can import them using either of the following scenarios:
JavaScript modules are a powerful feature that allows us to better organize our code, but it also allows us to share modules across projects. I hope you enjoyed and learned something new today.
This article was originally published on Live Code Stream by Juan Cruz Martinez, founder and publisher of Live Code Stream. He is a Software Engineer with more than 10 years of experience in the field, working in a wide variety of projects, from open source solutions to enterprise applications. Happily married, with a kid, officially engaged to JavaScript, in a love relationship with Python, and pursuing the writer’s dream! You can read this original piece here.
Live Code Stream is also available as a free weekly newsletter. Sign up for updates on everything related to programming, AI, and computer science in general.
Pssst, hey you!
Do you want to get the sassiest daily tech newsletter every day, in your inbox, for FREE? Of course you do: sign up for Big Spam here.
